Ultimate Guide to Cleaning Under Patio Roof: A Step-by-Step Approach
The patio roof can be a difficult area to clean due to its difficult access. Often, the dirt and debris build up over time, making it hard to keep the area looking neat and tidy. But with the right tools and a bit of effort, it’s possible to enjoy a clean and safe space beneath your patio roof.
Cleaning the area beneath your patio roof requires a few different steps, depending on the size of the space and the amount of dirt and debris present. A high-pressure cleaner or a garden hose with a spray attachment can be used to quickly remove large amounts of dirt and grime. For smaller areas, a broom and dustpan can be used for sweeping the area.
For more stubborn dirt, a scrubbing brush and mild detergent can be used to help shift the dirt. After the area is clear, it’s important to then use a good quality patio cleaner to prevent the dirt from returning.

Benefits of Maintaining a Clean Patio Area
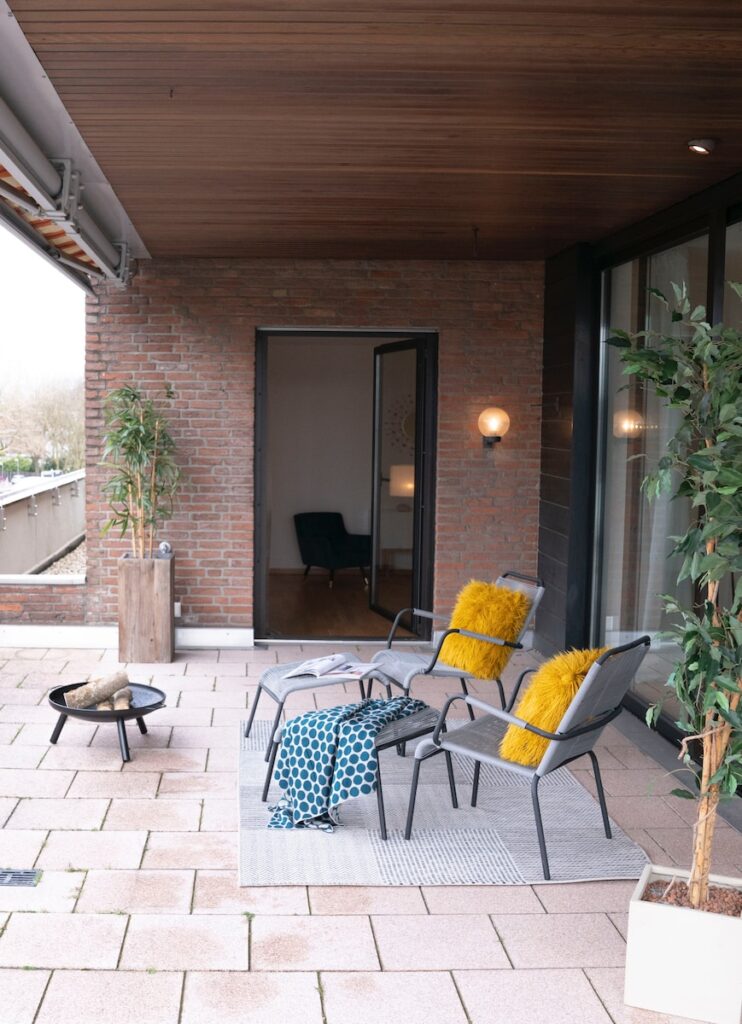
Cleaning under patio roofs offers several significant benefits. Firstly, it enhances the overall appearance of the patio, making it more appealing and enjoyable. A well-maintained patio area creates a positive impression and adds value to your property. Additionally, cleaning removes potential hazards such as slippery surfaces, sharp objects, or pests that might have found a home in the neglected space.
Moreover, maintaining a clean patio area contributes to the longevity of your patio’s structure and fixtures. Regular cleaning prevents dirt and grime from accumulating on surfaces, reducing the risk of wear and tear. Furthermore, by keeping the area clean, you can make the most of your patio space, utilizing it for various activities with ease.
Understanding the Challenges
Before delving into the cleaning process, it is essential to understand the challenges that arise when the area under patio roofs is neglected. Over time, dirt leaves, and debris can accumulate, creating an unsightly mess. This buildup may not only mar the patio’s aesthetics but also cause blockages in drains and gutters, leading to potential water damage and leaks.
Neglecting to clean the patio area can also result in the growth of mold and mildew. These fungal infestations not only look unappealing but also pose health risks to you and your family. Mold spores can cause allergies and respiratory issues, making it vital to address any mold buildup promptly.
Clearing the Area
Before embarking on the cleaning process, it’s essential to clear the area of any movable furniture and items. This step ensures that you have ample space to work with and prevents any accidental damage to your belongings during cleaning. Additionally, sensitive equipment like electronics or fabrics should be carefully stored or covered to protect them from potential water exposure.
Dusting and Sweeping
The first step in cleaning under patio roofs is to dust off loose dirt and debris. Use a soft brush or a microfiber cloth to gently remove dust from surfaces, including furniture and fixtures. Next, employ brooms and brushes to sweep the area effectively. Make sure to reach into corners and crevices where dirt might accumulate. Regular dusting and sweeping help keep the area tidy and prevent the buildup of grime.
Mould and Mildew Removal
One of the most critical aspects of cleaning under patio roofs is addressing mold and mildew buildup. These fungal growths thrive in damp and dark environments, making patios vulnerable to infestations. Mold and mildew not only tarnish the appearance of your patio but also pose health risks.
To tackle this challenge, consider using eco-friendly solutions to eradicate mould and mildew. White vinegar, baking soda, or hydrogen peroxide can be effective natural remedies for mould removal. Apply the chosen solution to the affected areas and scrub gently to remove the mould. Rinse thoroughly with water and allow the area to dry completely.
Safety First
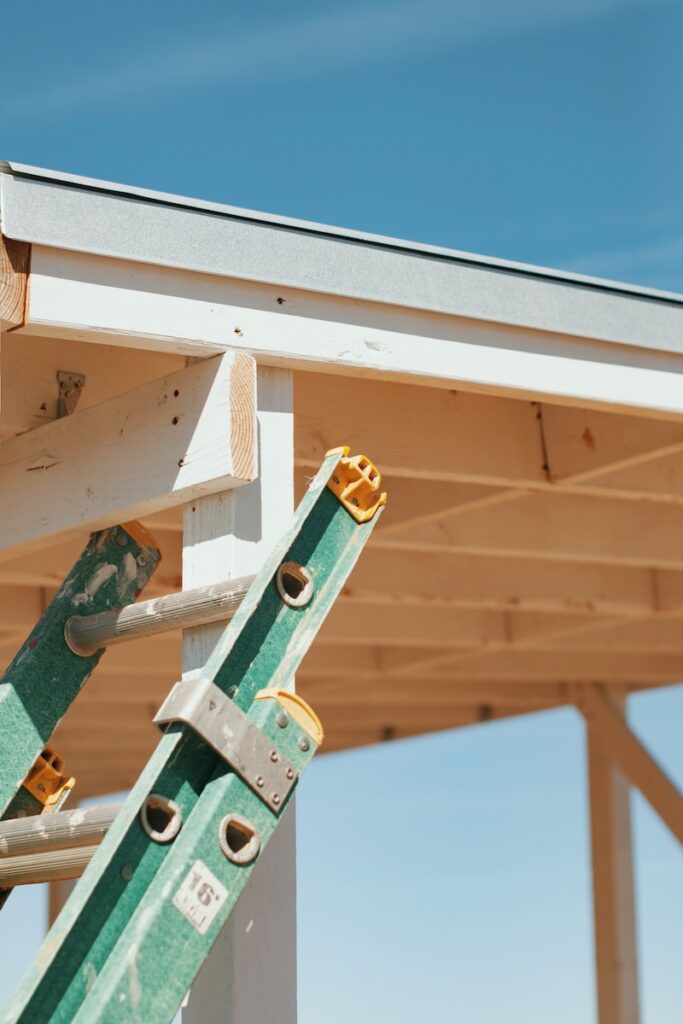
Safety first! A wise man once said that an ounce of prevention is worth a pound of cure. This is especially true when it comes to safety measures that should be taken while engaging in any potentially hazardous activity. To ensure a safe experience, it is important to wear protective gear, use a ladder properly, have a spotter, secure the area, and follow safety precautions.
When wearing protective gear, it is important to make sure that it is appropriate and fits properly. Protective gear such as helmets, gloves, and eyewear can help protect against injury in case of an accident.
-
Wear Protective Gear
Beyond a shadow of a doubt, safety first should be the mantra of any job site. The importance of wearing protective gear cannot be overstated. For starters, appropriate safety attire should be worn to ensure that the job is completed safely. Head protection is essential for any job site. Hard hats should be worn to protect the head from falling objects and debris. It is also important to wear safety goggles to protect the eyes from dust, dirt, and other particles that could be airborne.
Eye, ear, and respiratory protection should also be worn to protect against injuries and health risks associated with loud noises, hazardous chemicals, and other potential hazards. Dust masks should be worn to help filter out dust and other particles. It is also important to wear insulated gloves to protect the hands from electrical shocks and burns.
Furthermore, workers should also wear protective clothing such as long-sleeved shirts, work pants, and steel-toed boots. This will help protect against abrasions and cuts that may occur on the job. Finally, workers should also wear reflective clothing to ensure that they are visible to drivers and other personnel on the job site.
By following these simple safety guidelines, workers will be able to remain safe and secure on the job site.
-
Use a Ladder Properly
It is crucial to use a ladder properly when working at heights. Doing so is the only sure way to ensure safety. First and foremost, it is paramount that the ladder is strong and stable and that it is adjusted to the right angle to prevent tipping over. It should be placed on a flat and even surface that is free of clutter and hazards. It should also be secured in place with either rope or rubber feet so that it does not move once it is placed.
When standing on the ladder, it is important to always face the ladder and never try to climb sideways. Never stand on the top two rungs of the ladder as this can cause it to tip over. When ascending or descending, always use both hands on the rails and take it one step at a time; never try to rush. Never overreach for items that are too far away- instead, use a safe tool such as a pole or a stick to retrieve the items.
Lastly, it is important for someone to be standing on the ground at all times to ensure that the ladder does not tip over. This person should be keeping a watchful eye on the ladder user to make sure that they are abiding by all safety rules.
-
Have a Spotter
Having concluded the discussion on wearing protective gear and using ladders properly, it is now time to focus on another key safety component: having a spotter. No matter the task, it is always important to have a spotter. A spotter can be the difference between a successful job and a potentially fatal mistake.
A spotter is a person tasked with the duty of watching out for any potential dangers that may arise. This person should be aware of the working environment and should be knowledgeable in safety protocols. The spotter is there to ensure that the job is completed without incident.
The spotter should be alert and aware of the environment. They should be able to recognize any potential danger and alert the worker to the risk. The spotter should also be able to provide assistance if needed. This could be something as simple as helping to move a ladder or something more complicated, such as spotting a worker in a precarious situation.
The spotter can also be helpful in providing feedback to the worker. They can offer valuable insight into the best way to complete the job and offer advice on the best safety methods. The spotter can also provide important feedback on the worker’s progress, such as whether they are being too slow or too careless.

Gather the Right Supplies
Gathering the right supplies for cleaning your gutters is key. Make sure to get a sturdy ladder to safely reach the gutters. Once you have the ladder, a soft brush or broom is great for removing debris that has built up. Next, fill a bucket with soapy water, and don’t forget to put on rubber gloves. Finally, use a scrub brush to scrub away any gunk. Your gutters will be sparkling clean in no time!
-
Get a Sturdy Ladder
To ensure that your cleaning project is safe and successful, getting the right ladder is essential. When it comes to ladders, there’s no one-size-fits-all solution, so it’s worth investing in a few different ladders to suit different jobs.
First, consider the type of job you’ll be doing. If you’re only cleaning windows up to five meters high, a stepladder may be your best option. But if you need to reach higher than that, a single or double-extension ladder would be better. For most jobs, an extension ladder is a better choice, as you can adjust the height to suit the job.
When it comes to safety, it’s important to choose a ladder that’s rated for the job. Look for a ladder that is EN131-7 certified, which ensures it meets safety standards. Check the maximum weight for the ladder too, as some ladders may not be suitable for heavier users.
It’s also important to check the condition of the ladder before use. Always inspect the ladder for any signs of wear and tear, such as loose hinges or bolts, as these can cause the ladder to become unstable. Also, check for any signs of corrosion or rust, as these can weaken the ladder.
-
Use a Soft Brush or Broom
But before you start cleaning your gutters, you’ll need to gather the right supplies. One essential item is a soft brush or broom. A soft brush or broom can be used to brush away leaves, twigs, and other debris that might be clogging your gutters.
Choose a brush that is made from soft, non-abrasive bristles so that it won’t scratch the surface of the gutter. You can find these types of brushes at any hardware store. Or, if you prefer, you can make your own with a few simple supplies.
To make your own brush, you will need a broom handle, some dowel rods, and some soft bristles. Start by cutting your dowel rods in half and then attach them to the broom handle with wood glue. Then, dip the bristles in glue and attach them to the dowel rods.
Once your brush is assembled, it’s time to start cleaning. Start at the top of the gutter and work your way around, sweeping away any debris that you come across. Be sure to take your time, as this is a very important part of the gutter cleaning process.
-
Fill a Bucket with Soapy Water
Now that you have the right supplies together, the next step is to fill a bucket with soapy water. It’s important to have a good-sized bucket, preferably one that can hold a gallon or more, to make sure you have enough water to clean the job. Choose a gentle dish soap or the type of soap specifically made for outdoor cleaning.
Add the soap to the bucket and then fill it with warm water. Make sure to give it a good stir to dissolve the soap and get it sudsy. Having a warm bucket of soapy water will help loosen the dirt and grime that has been gathering over time.
The suds should be fluffy and durable, not too runny. If the suds seem too thin, add a bit more soap. If you have a stubborn spot, you can add a bit more soap and let it sit for a few minutes to give the soap time to break the spot down.
When you’re finished filling the bucket, it’s time to get to work. The soapy water will help keep your cleaning tools, like the soft brush or broom, from becoming too dirty while you work. It’ll also help keep the area you’re cleaning from becoming too slick.
Remove Debris
The task of removing debris begins with sweeping the roof. Leaves, twigs, and other bits of nature have gathered there, and a broom is the best tool to take care of them. To complete the job, it’s important to wipe down the patio furniture as well – this will prevent any dirt or dust from building up. Additionally, picking up fallen leaves and twigs will help keep the area neat and tidy. Finally, wiping surfaces and removing stains will help create a space that is clean and inviting.
-
Sweep the Roof
Finally, it’s time to get your hands dirty and start the hard work. Sweeping the roof may not sound like the most exciting task, but it’s an essential part of the preparation process. You grab the broom and start the tedious job of sweeping off all the debris that has settled on the roof. It’s a slow process, but your reward is a sparkling clean roof that’s ready for the paint job.
You start at the top of the roof and move your way down, making sure to get all the nooks and crannies. You take your time as you sweep away all the dirt, twigs, and leaves that have gathered on the roof. As you brush the debris away, you can’t help but feel a sense of satisfaction. You can almost see the roof slowly transforming into its former glory.
When you reach the edges, you switch from sweeping to using your hands. You pick up all the debris that you can and toss it off the side of the roof. You make sure to get rid of everything, as even the tiniest detail can make a difference in the end result.
Once you’re done, you stand back and admire your work.
-
Wipe Down the Patio Furniture
Ahh, the patio furniture – the centerpiece of your outdoor haven. It’s practically an extension of your living room, inviting friends and family to sit and enjoy the fresh air and sunshine. With the right care and maintenance, it can last for years. So, let’s get started with the cleaning process!
First, you’ll need to sweep the furniture off with a broom or brush. Then, use a wet cloth to wipe down the surface. This will remove dirt, dust, and debris that has accumulated over time. If you find any stains, use a mild detergent and warm water. Be sure to rinse off the soap, and allow it to air dry.
For any fabric pieces, such as cushions or pillows, you can use a vacuum with a soft brush attachment to remove dust and dirt. If the fabric is washable, follow the manufacturer’s instructions on cleaning. Otherwise, use a damp cloth to spot-clean the furniture.
Finally, don’t forget to check the furniture for any rust spots or damage. You may want to use a stain remover or rust inhibitor to help protect your outdoor furniture.
-
Pick up Fallen Leaves and Twigs
Tackling the task of outdoor cleaning can be daunting. But boldly taking the first step sets you up for success.
The next step is to pick up fallen leaves and twigs. This is an important step, as it helps maintain the overall integrity of the space. It also ensures that the area is free of debris, which can damage furniture and equipment.
Start by gathering the tools you will need: a broom, a dustpan, a rake, and a garbage can. Make sure to wear protective gear such as gloves and safety glasses.
Sweep the area to gather the leaves and twigs. Utilizing a broom and dustpan is an effective way to do this. Use the rake to pull large twigs and branches from the ground and the garbage can collect the leaves and twigs.
Once you have completed this step, sort through the leaves and twigs you have collected. Dispose of any debris that is not compostable or recyclable. Place the compostable materials in a compost bin or pile away from the house.
Organize the leaves, twigs, and branches into neat piles and place them in a designated area.
Clean the Gutters
Gutters require a deep clean to ensure that they are working correctly and efficiently. To achieve this, start by scooping out any debris with a trowel and gloves. Once complete, rinse the gutters with a hose to ensure that any remaining dirt is removed. This will also allow you to check for any leaks. Once the gutters are free of debris, dirt, and leaves, it is time to clean the roof. This involves scrubbing the roof to remove any mold and dirt and rinsing it off with a hose. Finally, dispose of all waste responsibly.
-
Scoop Out Debris
Now that the gutter is prepped and ready to be cleaned, it’s time to start scooping out any debris that has been left behind. Using a sturdy ladder, climb up to the gutters and scoop out leaves, sticks, moss, dirt, and anything else that has made its way into the gutter. Be sure to wear protective gloves to protect your hands from any sharp debris.
To make sure the gutters are completely debris-free, use a trowel or hand shovel to get to the nooks and crannies. Don’t forget to check the downspouts too! If they’ve been clogged with leaves, you can use a plumber’s snake to unclog them.
Once you’ve managed to scoop out all of the debris, it’s time to rinse out the gutters. Attach a hose to the spigot and turn the water on full blast. This will help wash away any leftover dirt and debris and will also make sure that the gutters are clear of any blockages.
Finally, check for any leaks in the gutter system. If there are any, you can use a patch kit to fix them.
-
Rinse with a Hose
Now it’s time to rinse the gutters with a hose. Start at the top and work your way down, washing away any remaining debris. Pay special attention to the corners and bends. This is where most of the clogging occurs, and you want to make sure it is completely removed. If the water does not seem to be washing away the debris, use a stiff brush to scrub away any stuck-on pieces.
Be sure to bold the entire length of the gutter, not just the areas where debris has been collected. For best results, use a power washer or a garden hose with a high-pressure nozzle. This will help remove the dirt and grime more easily and thoroughly. You can also add a cleaning solution to the water for extra power.
If you are cleaning a two-story house, you may need to rent or purchase a ladder to reach the gutters. A long-handled brush and a garden hose can also help you reach the higher parts of the gutter. It is important to be safe when handling ladders and other tools and to wear protective gloves and eyewear when cleaning.
-
Check for Leaks
After removing the debris from the gutters, it is important to check for leaks. Leaking gutters can cause a lot of damage to a home, and fixing a leaky gutter is often much easier than replacing an entire gutter system. To check for leaks, start by filling the gutters with water. If you notice any leaks, check for possible causes, such as holes, corrosion, or damaged seals.
It is also important to inspect all the areas around the gutters, including the roof, soffit, fascia, and siding. If any of these areas are damaged, it could be the cause of the leak. If you find any damaged areas, you may need to repair or replace them.
Another way to check for leaks is to look for stains, discoloration, or mold on the walls or ceiling. These can be signs of a leaking gutter. If you see any of these signs, it is important to fix the leak as soon as possible.
Finally, it is important to check the downspouts for any blockages or clogs. Clogged downspouts can cause water to back up and overflow from the gutters, leading to leaks.

Pressure Washing
Pressure washing is a great way to get your outdoor surfaces clean. Clear large debris from the area to be washed before beginning. Choose the right nozzle for the job, as the wrong one may cause damage. Always apply the water at an angle, avoiding direct contact with surfaces and avoiding damage. For cleaning wood decks, use a fan tip to avoid damaging the wood. Deck cleaning requires special attention. Use the right detergents and chemicals for the job. Always use biodegradable detergents or those specifically designed for pressure washing.
-
Clear Large Debris
Having cleared the gutters and ensured that the downspouts are unclogged, it is now time to move on to the next stage of pressure washing: clearing out large debris. This can include branches, leaves, and other debris that has built up over time and is not easily removed with a regular garden hose. When it comes to clearing out large debris, it is important to use the right nozzle.
It is also important to use the right type of nozzle, as this will help ensure that you do not damage any surfaces when pressure washing. The most common types of nozzles are fan nozzles, which are ideal for cleaning decks, and turbo nozzles, which are ideal for clearing out large debris. When using the fan nozzle, it is important to start at the lowest pressure setting and work your way up, as this will help ensure that you do not damage any surfaces.
Another important consideration when pressure washing is to make sure that you do not damage any decks. It is important to be careful when pressure washing a deck, as the high pressure of the water can cause damage to the wood. When pressure washing a deck, it is important to use a detergent or chemical that is specifically designed for wood.
-
Use the Right Nozzle
Nothing compares to the feeling of watching your property transform into the sparkling, vibrant home it once was. But to really get the job done and avoid costly damage, you need to make sure you use the right nozzle while pressure washing.
Nozzles come in a variety of sizes and shapes, and each one serves a different purpose. Some are designed to reach higher up on the surface, while others are meant to create a concentrated stream of water to clean away tough dirt and grime. If you’re unsure which nozzle to use, it’s best to consult a professional for advice.
When cleaning with the right nozzle, you can expect a more powerful stream of water that cuts through dirt and mold quickly and efficiently. The pressure can be adjusted to ensure that the nozzle is powerful enough to tackle tough jobs but not too powerful that it causes damage.
For instance, a zero-degree nozzle is designed for maximum power and is ideal for removing tough stains from concrete surfaces. This type of nozzle should be used with extreme caution, as it can cause significant damage to delicate surfaces. Alternatively, a fan nozzle is designed for a gentler, more spread-out stream of water.
-
Avoid Damage to Surfaces
After cleaning the gutters, it’s time to move on to the next step in exterior maintenance: pressure washing. Pressure washing is an effective way to clear large debris and remove dirt and grime from surfaces, but it’s important to use the right nozzle and pressure settings to avoid damage to the surface.
The type of nozzle you use to pressure wash can make a big difference in the results. A fan-shaped nozzle is ideal for most cleaning jobs, as it produces a wide, gentle spray that can be adjusted to the correct pressure setting. A cone-shaped nozzle, on the other hand, is more powerful and should be used for more difficult jobs, such as removing paint or graffiti. Using the wrong nozzle may result in damage to the surface, so it’s important to use the right one for the job.
Pressure washers come with adjustable pressure settings. It’s best to start with the lowest setting and increase the pressure slowly, if necessary. This will help avoid accidental damage to the surface, such as gouging or stripping of paint. In addition, it’s important to keep the nozzle moving across the surface to avoid creating uneven pressure on the material.
Clean the Shingles
The first step to cleaning the shingles is to remove moss and algae. An effective way to do this is by spraying them with a garden hose. This will help break down the buildup and loosen the debris. Next, use a non-toxic cleaner to get rid of any remaining dirt and grime. After the cleaner has been applied, give the shingles a good rinse with a garden hose. If there are any stubborn areas, give them a scrubbing with a soft-bristled brush. Finally, rinse the shingles again with the garden hose to make sure all of the cleaner is off.
-
Remove Moss and Algae
Moss and algae are not only unsightly but can also cause damage to the shingles if they are left unattended. Thus, it is important to remove both from the surface of the shingles before pressure washing them.
The first step in removing moss and algae is to use a non-toxic cleaner. This cleaner should be applied to the shingles and allowed to sit for a few minutes. Once it has had time to work, it can then be rinsed off with a garden hose. The water pressure should not be too high, as this can damage the shingles.
Once the non-toxic cleaner has been rinsed off, it is time to begin scrubbing the shingles. A stiff brush should be used to scrub away any moss or algae. It may take a few passes to get all of the moss and algae off of the shingles. Once all of the debris has been removed, the shingles should then be rinsed off with a garden hose. This will help to remove any residual cleaner, as well as any remaining moss or algae.
It is important to remember to be gentle when scrubbing the shingles.
-
Use a Non-Toxic Cleaner
Now that the moss and algae have been removed, it’s time to use a non-toxic cleaner to further purify the shingles. Non-toxic cleaners are far better and safer for the environment, as some pressure washers may contain compounds that can be harmful to the environment.
A great method to use is to first mix the non-toxic cleaner with water in a bucket according to the directions. It’s important to make sure that the mixture is not too strong or too weak. With a soft-bristled brush, apply the solution to the shingles and scrub lightly. This will help remove any remaining dirt and debris that may have been left behind.
When finished, take a garden hose and rinse the shingles thoroughly. This will help to ensure that all of the cleaners has been removed from the surface. Take care to avoid getting the solution in any plants or flower beds, as this could damage them.
When all of the cleaning solution has been removed, you can be confident that the shingles are clean and safe. With a little bit of routine maintenance, you can enjoy a beautiful and clean exterior for years to come!
-
Rinse with a Garden Hose
Once you’ve completed the other steps of pressure washing your shingles, it’s time to rinse! With a garden hose, you can use a simple sprayer to spray the roof from the top down. A gentle spray will be more than enough to remove any residue from the roof. This will also help to rinse away any algae or moss that wasn’t completely removed during the cleaning process.
Be sure to move the sprayer slowly and methodically across the roof, making sure to keep it at a consistent distance from the roof. If you move too close, you risk damaging the shingles. Italicize as you go, paying close attention to any areas where the cleaning solution may have pooled. If you have a ladder, you may also want to use it to get a better angle on the roof, so you can reach all the nooks and crannies.
When you’re done, you’ll want to double-check that you’ve rinsed away all of the cleaning solutions. This is important, as any remaining residue can damage the shingles over time. You can use a wet/dry vacuum to make sure that all of the cleaning solution has been removed from the roof.

Frequently Asked Questions (FAQ) about Cleaning Under Patio Roof
-
Why do I need to clean under my patio roof?
Cleaning under your patio roof is essential to maintain a clean and inviting outdoor space. It helps prevent the buildup of debris, dust, and mold, which can compromise the appearance and structural integrity of the patio. Regular cleaning also ensures a comfortable and enjoyable environment for your outdoor activities.
-
How often should I clean under my patio roof?
The frequency of cleaning under your patio roof depends on factors such as the climate, nearby vegetation, and how often you use the space. Generally, it’s recommended to clean it at least twice a year, preferably before and after the rainy season or at the start and end of each outdoor season.
-
What tools do I need for cleaning under the patio roof?
The tools you’ll need include a broom, stiff-bristled brush, soft-bristled brush or sponge, a pressure washer (if suitable for the material), a bucket, mild dish soap or patio cleaning solution, and water. You may also require safety gear such as gloves and protective eyewear.
-
Can I use a pressure washer for all types of patio roofs?
A pressure washer can be effective for cleaning sturdy materials like metal, wood, or concrete, but it may not be suitable for delicate materials like plastic or vinyl. Always check the manufacturer’s guidelines and test on a small inconspicuous area before using a pressure washer on the entire surface.
-
How do I clean mold and mildew under the patio roof?
To clean mold and mildew, mix water with white vinegar or use a commercial mold and mildew remover. Apply the solution to the affected areas and scrub gently with a soft-bristled brush or sponge. Rinse thoroughly with water and ensure proper ventilation to prevent mold from returning.
-
Can I prevent debris from accumulating under the patio roof?
Yes, you can take preventive measures to reduce debris buildup. Installing gutter guards can help prevent leaves and debris from clogging gutters and falling onto the patio. Regularly trimming nearby trees and bushes will also minimize the amount of debris reaching the roof.
-
Can I clean under the patio roof during the rainy season?
It’s best to avoid cleaning under the patio roof during heavy rainfall, as the wet surfaces can be slippery and dangerous. Wait for a dry day or clean shortly after the rain has stopped to ensure safe conditions.
-
How do I ensure safety while cleaning under the patio roof?
Prioritize safety by wearing appropriate clothing, including long sleeves, pants, and gloves. If the patio is high off the ground, use a stable ladder or scaffold and have someone assist you. Always follow safety guidelines for using cleaning equipment and chemicals.
-
Can I hire professional cleaners for patio roof cleaning?
Yes, you can hire professional cleaning services if you prefer to have the job done by experts or if the patio roof requires specialized cleaning methods. Professional cleaners have the experience and equipment to efficiently clean and maintain your patio roof.
-
Will cleaning under the patio roof prolong its lifespan?
Yes, regular cleaning and maintenance can extend the lifespan of your patio roof. Removing debris and preventing mold growth help to preserve the structural integrity of the roof and enhance its appearance for years to come.
Conclusion
Cleaning under the patio roof is a tedious job, but it’s worth it. The result is a beautiful patio roof that looks freshly installed. With the right supplies, debris can be removed, gutters can be cleaned, and the shingles can be washed with pressure. After that, it’s important to inspect the posts for any damage and repair or replace any that might be necessary. Lastly, seal and protect the patio roof to ensure it lasts for years to come. Taking the time to care for the patio roof will be rewarded with a beautiful outdoor space that can be enjoyed by family and friends. It’s a job that can be done now and will pay off for years to come!